![]()
![]()
A ready-to-use firmware base for RL Mini v2, RL Mini v3, and other compatible CAN nodes, with Cyphal/CAN and DroneCAN support.
Please, refer to the docs in this repo for details:
Supported features:
- Cyphal/CAN and DroneCAN protocol support, together or separately depending on the firmware target,
- Cyphal/DroneCAN bootloader (testing stage),
- You can try the software in Software-In-The-Loop (SITL) mode,
- Small firmware image and software is friendly for customization,
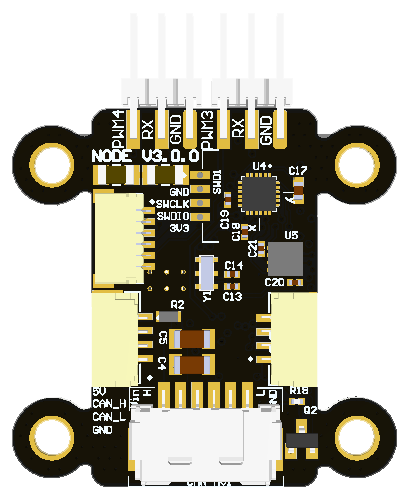
- Redundant CAN interface (node v3),
- MPU-9250 IMU (node v3).
- CAN terminator resistors control (node v3).
Roadmap / Not supported or tested yet:
- Dynamic Node Allocation (DNA),
- Vibration analysis: estimate dominant frequency and magnitude of vibrations for diagnosing mechanical issues or ensuring smooth operation in robotic and embedded systems in real time.
- AS5600 I2C sensor encoder for servo position estimation
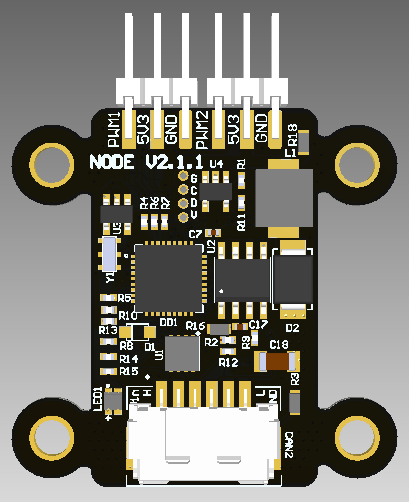
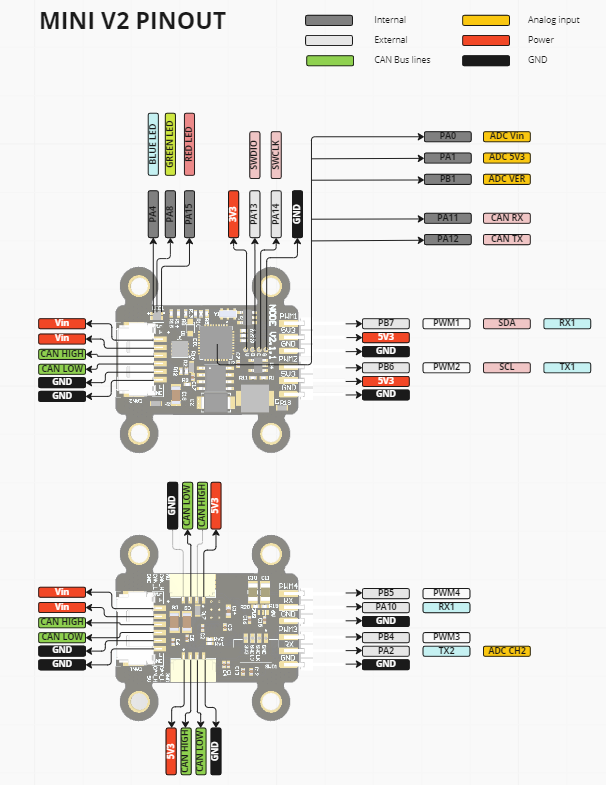
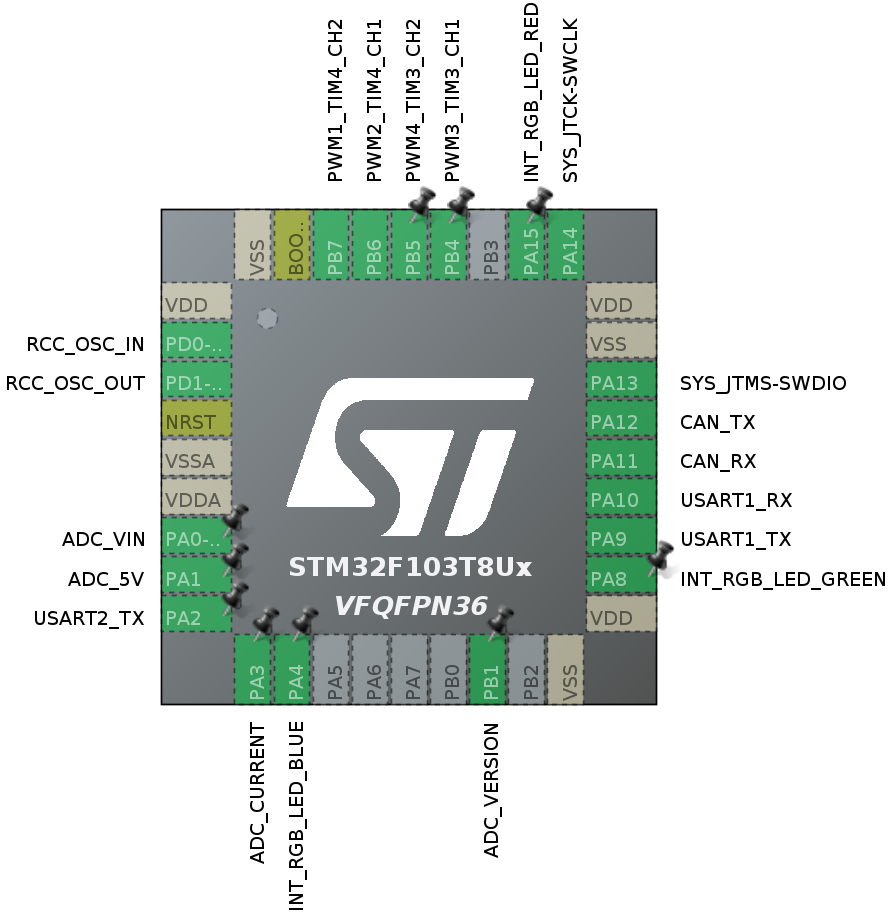
The software supports RL v2 nodes (stm32f103, 128 KBytes flash) and v3 nodes (stm32g0b1, 512 KBytes flash).
| Name | View | Pinout | STM32CubeMX |
|---|---|---|---|
| Mini v2 stm32f103 128 KBytes flash |
 |
 |
 |
| Mini v3 stm32g0b1 512 KBytes flash |
 |
 |
 |
This node is a versatile CAN-connected controller integrating PWM control, IMU sensing, and dual CAN bus communication, suitable for robotics, automation, test rigs, and other embedded systems. Below are example use cases.
| Use case | Description |
|---|---|
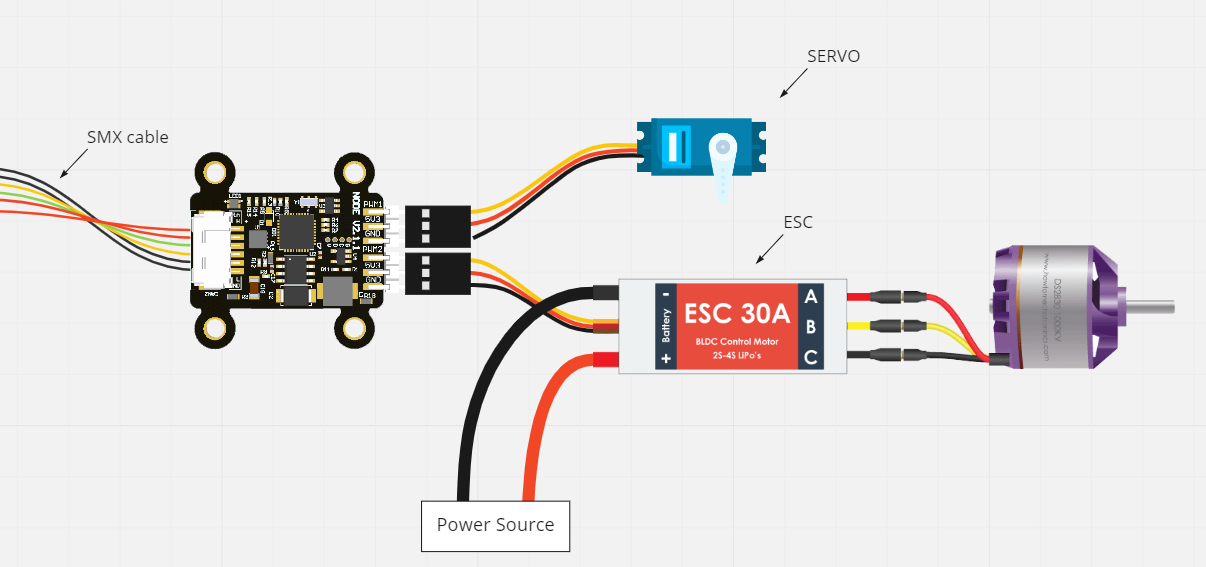 |
1. Basic ESC and Servo Control PWM1-4 to control PWM ESCs via Cyphal/CAN or DroneCAN. PWM1-2 to control 5V servos. DroneCAN interface: RawCommand / ArrayCommand. Cyphal/CAN interface: UDRAL setpoint |
 |
2. Advanced ESC Control with Feedback PWM3-4 for controlling PWM ESCs UART or ADC feedback on the FB pin. DroneCAN interface: esc.Status / actuator.Status. Cyphal/CAN interface: UDRAL Feedback |
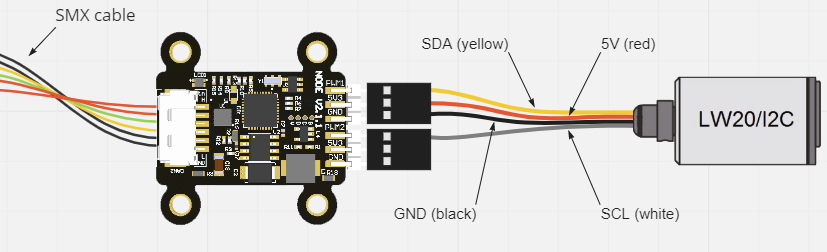 |
3. CAN-I2C Converter PWM1 and PWM2 as I2C pins. Cyphal/CAN or DroneCAN adapter for I2C peripherals. DroneCAN examples: range_sensor.Measurement. |
| 4. Camera Gimbal or Sensor Mount PWM1-2 to control a servo-based gimbal. Suitable for stabilized cameras, sensors, or inspection tooling. DroneCAN interface: camera_gimbal.AngularCommand. |
|
| 5. End Effector / Servo Latch PWM1-2 to control a servo-based latch, clamp, or lightweight end effector. Suitable for ground robots, mobile platforms, and general-purpose tooling. DroneCAN interface: hardpoint.Command. |
|
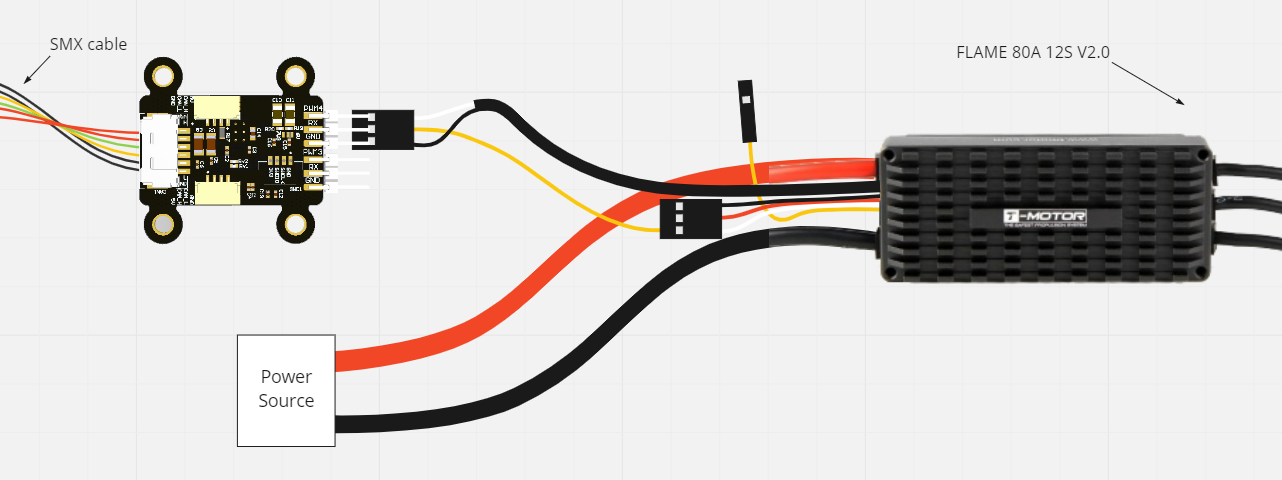
| 6. CAN-CAN converter CAN1 for Cyphal/CAN or DroneCAN. CAN2 for another CAN protocol. CAN adapter for another CAN device. Examples: KST/CAN servo, CANopen motor, CAN BMS. Keep a consistent CAN network. Supported only on Mini v3 node. |
|
| 7. Servo Position Estimation with I2C Encoder PWM3-4 for a servo PWM1-2 for a AS5600 I2C encoder. Estimate the angular position of the servo. DroneCAN interface: actuator.Status. |
|
| 8. Vibration Analysis with IMU Utilize the onboard IMU (MPU-9250) Monitor vibrations in your system. Estimate dominant frequency and magnitude of vibrations. Useful for diagnosing mechanical issues or ensuring smooth operation in robotic and embedded platforms. DroneCAN interface: ahrs.RawIMU. |
The following table outlines the compatibility of the project with different operating systems, modes, and support timelines.
| Operating System | DroneCAN Support | Cyphal Support | Notes |
|---|---|---|---|
| Ubuntu 24.04 | ✅ Supported | ✅ Supported | Latest Ubuntu LTS version. |
| Ubuntu 22.04 | ✅ Supported | ✅ Supported | Deprecated in mid-2026; unsupported in April 2027. |
| Windows (2022) | Current "latest" Windows version. | ||
| Manjaro (latest) | No longer maintained by this project; may still work. | ||
| Ubuntu 20.04 | ❌ Not Supported | ❌ Not Supported | Deprecated in 2025-04-15. |
Requirements:
- arm-none-eabi-gcc
- CMake
- Python
- STM32CubeMX/STM32CubeIDE
- st-link
Installation (Ubuntu, Manjaro, Windows):
# 1. Make a fork of the repository and clone the repository with submodules
git clone git@github.com:RaccoonlabDev/mini_v2_node.git --recursive

# 2. Install python requirements
pip install -r requirements.txt

# 3. Install other requirements (toolchains, etc.)
./scripts/install.py
Build (examples):
# DroneCAN firmware:
make dronecan_v2
make dronecan_v3

# Cyphal firmware:
make cyphal_v2
make cyphal_v3
Note: Cyphal builds require access to the private libcpnode repository. Fork CI skips Cyphal (and combined v3) builds.
Upload/Flash:
make dronecan_v2 upload
# or:
make dronecan_v3 upload
SITL (Software-In-The-Loop):
make sitl_dronecan run
# or:
make sitl_cyphal run
GUI Tools
For full interaction with the node use:
The project is organized into three main layers to make it portable across boards:
- Peripheral Layer (Src/peripheral)
- STM32CubeMX-generated HAL code is wrapped in lightweight C++ classes.
- High-level code accesses peripherals only through the
HALnamespace. - Goal: minimize direct dependency on STM32CubeMX and ease migration to other platforms.
- Board Support / Platform Layer (Src/platform)
- Board-specific configuration (pins, ADC channels, LEDs, CAN terminators, etc.).
- High-Level Layer
- Drivers (Src/drivers) — external devices (e.g. IMU).
- Modules (Src/modules) — application logic, e.g. vibration metrics.
- Uses DroneCAN or Cyphal/CAN for communication.
Build Targets
- Build and flash using Make, for example:
make dronecan_v3 - STM32CubeMX is used only to generate peripheral code. Application logic starts in
application_entry_point()called frommain.c.
Standards & Hardware Info
- Boards follow an internal standard for peripherals (ADC_VIN, ADC_5V, ADC_CURRENT, RGB LED, CAN_TERMINATORS, etc.). See docs/hardware.md for hardware details.
All nodes run a minimal application after flashing so you can verify the board is working without extra setup:
- CAN communication starts according to the selected build target (DroneCAN or Cyphal/CAN).
- LED indicator follows a standard pattern common to all Raccoonlab boards (similar to PX4 LED Meanings and Ardupilot LED meanings):
| LED Pattern & Color | Meaning |
|---|---|
| Blinking Blue/Red | Initialization / Calibration |
| Blinking Yellow | Minor Failure / Warning |
| Blinking Magenta | Major Failure / Error |
| Blinking Red | Fatal Malfunction / Critical |
| Blinking Blue | Ready — No GPS Lock |
| Solid Blue¹ | Armed — No GPS Lock |
| Blinking Green² | Ready — 3D Fix (8+ satellites) |
| Solid Green¹² | Armed — 3D Fix (8+ satellites) |
¹ Applicable to nodes that support an armed state (e.g. actuator nodes).
² Applicable to nodes that use GPS (e.g. GNSS or combined nodes).
This repository can be used in three ways:
| Approach | When to Use | Summary |
|---|---|---|
| Fork (recommended) | Use it by default | One fork per user/org |
| Template (advanced) | When multiple apps are needed. | Unlimited repos per user/org, but extra steps to restore history and no automatic pull requests. |
| Framework (testing stage) | When you want to keep your application in a separate repository and reuse this repo as a submodule/vendor dependency. | Put your custom boards, modules, and drivers in your app repo and build against node-core via custom CMake/Make wrappers. |
▶ Workflow 1 — Fork (Recommended)
-
Fork this repository on GitHub (top-right “Fork” button).
-
Clone your fork:
git clone git@github.com:<your_org>/mini_v2_node.git --recursive
-
Create your feature branch from the main branch:
git checkout -b pr-my-feature origin/main
-
Push and open pull requests as usual:
git push origin pr-my-feature
✅ This is the simplest and most familiar workflow.
▶ Workflow 2 — Template (Advanced, for Multiple Apps)
-
Create a new repository from this template Click “Use this template” on GitHub → create your own repo.
-
Restore the full commit history with tags from the original repo
git remote add upstream https://github.com/RaccoonlabDev/mini_v2_node.git
git fetch --tags upstream
-
Create your feature branch from the latest available tag
git checkout -b custom-<LATEST_TAG> <LATEST_TAG> # branch named after upstream version
git push origin custom-<LATEST_TAG>
-
Optional: Add a readme branch for extended documentation or onboarding if you want to keep docs separate from code.
git checkout --orphan readme
git rm -rf .
echo "hello there" > README.md
git add README.md
git commit -m "first commit"
git push origin readme
✅ This workflow is ideal if you need multiple independent applications, separate permissions per repo, and still want to keep upstream history.
▶ Workflow 3 — Framework (Testing Stage, for Vendor/Submodule Integration)
Use this workflow when your application lives in its own repository and this repo is included as a git submodule or vendor dependency.
- Add this repository to your application repo as a submodule, for example under
third_party/node-core. - Keep your application-specific code outside this repo, typically in a layout like:
your_app/ ├── CMakeLists.txt ├── Makefile ├── third_party/node-core/ └── src/ ├── boards/<vendor>/<board>/ ├── modules/ └── drivers/ - Point the build to your external sources using
NC_APP_SRC_DIR. The build system already knows how to look there for:boards/<vendor>/<board>modules/...drivers/...
- Provide your own top-level
CMakeLists.txtorMakefilewrapper and forward the build tonode-core. A minimal example:NODE_CORE := third_party/node-core APP_SRC := $(CURDIR)/src my_board_dronecan: $(MAKE) -C $(NODE_CORE) build \ NC_BOARD=my_vendor/my_board \ NC_TARGET=dronecan \ NC_APP_SRC_DIR=$(APP_SRC) \ NC_BUILD_DIR=$(CURDIR)/build
- If you need custom aliases or board-generation helpers, define them in your application repo similarly to this repo's
Makefile.vendor. - Define board targets in
src/boards/<vendor>/<board>/<target>.cmake. The default convention is documented inSrc/boards/<vendor>/<board>/.
This workflow is useful when node-core is treated as a reusable firmware framework and your product-specific code, board definitions, and release process are maintained separately.
Custom application versioning
- Recommended format:
v<upstream-version>-<app-version> - Example:
v1.3.0-0.1.0(based on upstreamv1.3.0, app version0.1.0).
If you are struggling with the software building, please refer to the build workflow build_and_deploy.yml for a hint. If it doesn't help, you can open an issue.